From the previous thread where I asked that question since I have no idea what you guys were talking about (and Ego also).
http://www.pcabusers.com/forums/showthread.php?t=46554
What are the products you guys use for wax or polish?
What tools are used?
How often should one apply wax or polish? In fact, what is the difference between wax and polish?
What about the interior? What products are used.
Car Care
-
Executioner

- Life Member
- Posts: 10352
- Joined: Wed Nov 22, 2000 11:34 am
- Location: Woodland, CA USA
-
renovation

- Posts: 13859
- Joined: Wed Nov 22, 2000 8:24 am
- Location: on a lake in michigan
- Contact:
i have always used a paste wax on my cars when i wax them . and armorall for the dash and hard surfaces inside .
wax depends but normally it's really only good for a week and thatsif its good stuff (wax ) but ask others as im just guessing on a time between rewaxing !
way i use to tell if my wax was good on my car .was if the rain beaded on the hood then it still was working !
wax depends but normally it's really only good for a week and thatsif its good stuff (wax ) but ask others as im just guessing on a time between rewaxing !
way i use to tell if my wax was good on my car .was if the rain beaded on the hood then it still was working !
the Last time I was Talking to myself . I got into such a heated argument . that is why I swore I never talk to that guy again. you know what it worked now no buddy talking to me. 

i could type for days on this topic (detailing being one of my primary hobbies for the past few years now).
i don't have a lot of time right now to type out everything, but a good basic detail includes the following:
1. completely wash vehicle and remove all dirt, tar, bugs, etc from exterior
2. use a clay bar to remove embedded surface contaminants. the "plastic bag test" is a good indication of how much dirt and metal filings, etc are stuck on the paint. you literally use a plastic sandwich bag...put your hand in it...and rub over the paint gently. do this before/after claying and you'll be amazed at the difference.
3. polishing via machine buffer. this can be either a random orbital (very popular old school standard is the Porter Cable 7424) or rotary buffer (you must practice with this prior to using on a nice vehicle!).
--swirl/scratch removal with polishes/compounds. these come in a vast array of brands, different levels of aggressiveness, etc. standard rule is to start with the least aggressive and step up to strong polishes and/or pad combos as needed for the specific paint you're working with.
--following polishing you seal or wax the paint to protect it. sealants generally last longer than waxes while aesthetics tip in favor of waxes. there is a HUGE variety of choices and the look of one product may be great to one person and not impressive to another. Zaino is a "boutique" sealant available online...fairly expensive...but very durable and a high gloss.
there is much more to each step...separate processes used for trim, wheels, tires, interior surfaces (vinyl/cloth/leather), glass care, etc.
it's a whole new world of OCD!!!! haha
more to come...
-
EvilHorace

- Life Member
- Posts: 6611
- Joined: Wed Nov 22, 2000 7:14 am
- Location: Greenfield, WI
Wow, how much time does all that take? That's my problem with motivating to polish, wax my old cars and it's a job I really don't like to do either.
On a car with newer paint, it's easy but with older cars that have paint issues, it can be very time consuming and you still might not be happy in the end.
I have a '95 red Volvo 855T and it's probably spent most of its life outside. It definitely has paint issues. It starts turning pinkish until I go over over it with some stuff from our detail department (need to do that again) and its clear coat isn't all there anymore either. I'm debating spending the time to try re-doing all that vs paying someone as I know it won't be fun, at least not for me.
<img src="http://www.pcabusers.org/images/evil2.gif">

How much time? I have a VW Passat wagon, not a big car. Last fall I used my Porter-Cable 7424 orbital buffer to polish out light scratches with a swirl mark remover, followed that up with a light non-aggressive polish and then applied two coats of an acrylic sealant. Of course, before doing any of the above, I washed the car, took off tar and bugs and used clay or rubbing compound on the obvious paint defects. I then masked off the black plastic and chrome trim so I wouldn't have to deal with removing polish from those surfaces.
It took me an entire weekend. My car looked great. The acrylic paint sealant did a great job and held up for about 5 months. I am going to have to do it again before winter hits and I dread it.
I can't imagine claying an entire car. People do, but they must have a lot of time and a lot of beer.
The sealant I used is made by a company called Danase. Mail order only. Its a good product.
Even with a random orbital buffer, this is hard work and takes time. Rotary buffers are for those who really know what they are doing. You can burn the paint off a car in a second with a rotary if you don't know what you are doing.

good post...i've dealt with danase in the past and they have quality products and good customer service as well. most of my supplies come from Autogeek, but i've used a bunch of others for one-off items.Lmandrake wrote:How much time? I have a VW Passat wagon, not a big car. Last fall I used my Porter-Cable 7424 orbital buffer to polish out light scratches with a swirl mark remover, followed that up with a light non-aggressive polish and then applied two coats of an acrylic sealant. Of course, before doing any of the above, I washed the car, took off tar and bugs and used clay or rubbing compound on the obvious paint defects. I then masked off the black plastic and chrome trim so I wouldn't have to deal with removing polish from those surfaces.
It took me an entire weekend. My car looked great. The acrylic paint sealant did a great job and held up for about 5 months. I am going to have to do it again before winter hits and I dread it.
I can't imagine claying an entire car. People do, but they must have a lot of time and a lot of beer.
The sealant I used is made by a company called Danase. Mail order only. Its a good product.
Even with a random orbital buffer, this is hard work and takes time. Rotary buffers are for those who really know what they are doing. You can burn the paint off a car in a second with a rotary if you don't know what you are doing.
a full detail for me can run from 5-14 hours...really depends on the size of vehicle, level of correction, etc. i did a black yukon a few years ago and was wishing for death by the end.
-
Executioner
- Life Member
- Posts: 10352
- Joined: Wed Nov 22, 2000 11:34 am
- Location: Woodland, CA USA
Stolen from elsewhere cuz I will burn dinner if it don't get up in 15 seconds:
Clay bars are used in the detailing, automotive reconditioning and auto body shop professions to remove paint over spray, tree sap and industrial fallout from the cars painted surfaces. It also works on glass, plastics and many metals.
Automotive clay is a pliable, petroleum resin product (polybutene), containing mild abrasives. These abrasives are extremely small and mixed in with a powdered synthetic detergent. To this mixture abrasives are also added, such as, silica sand, calcium carbonate, alumina, ceramics and also Green Carborundum.
Many claim that clay bars are not abrasive but that is incorrect. They are all abrasive to a degree, some add more abrasives than others and these are usually identified as being “hot” bars. I actually removed the clear from a cars lower panel once using a “hot” bar, so be cautious!
Does the clay bar actually remove contaminates or does it just shave off the top, making the specks flush with the paint? The answer is yes and no. It depends on the contaminate. The clay bar may not totally remove rail dust, but it will shave off the protruding particles. It will, however, easily remove tree sap or paint over spray.
to add to the claying...
i haven't heard of the "hot" bars (but i like the term). you buy clay in various levels of aggressiveness. i normally have two types ready to go...i'll start with a mild one and if that doesn't do the trick, then i step it up to the stronger type. depending on the paint hardness, clay type, etc, you will usually introduce a certain level of marring to the paint. i usually plan on polishing after claying anyway, so removing these new scratches is nothing to be worried about.
what is important during claying:
1. use plenty of lubricant (clean soapy water or a quick detail spray) at all times
2. if you drop the clay on the ground: THROW IT OUT (never reuse clay if you drop it...even if you think you can pick out the dirt/rocks...you'll be sorry if you reuse it!!!)
3. check the clay frequently for dirt and kneed it/fold it over frequently to keep a fresh surface on the paint.
claying never takes me that long...to do an entire car is maybe 30 minutes. if it is heavily contaminated it will take longer.
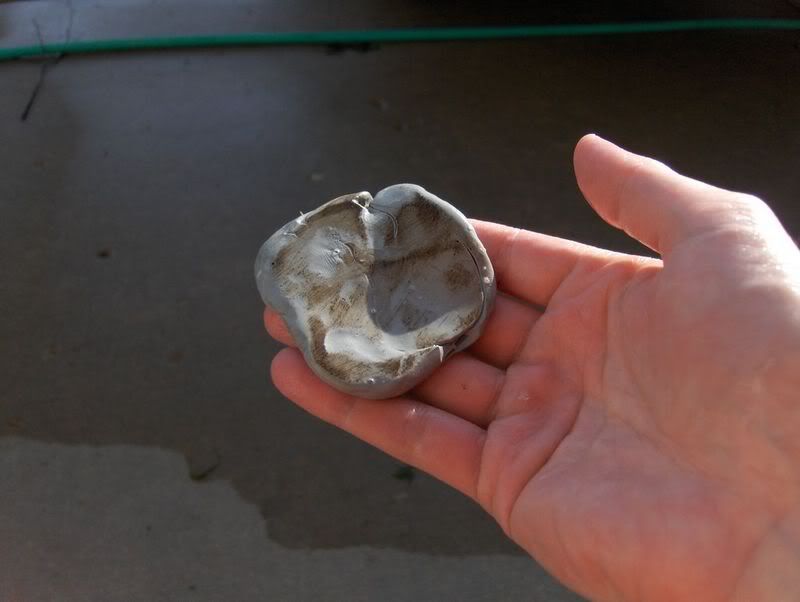
here is an example of what clay can do...this was a VERY contaminated black tahoe. the clay got this dirty after only 1/3 of the tailgate...and remember, all of this crap is pulled off the paint AFTER a full washing.
i haven't heard of the "hot" bars (but i like the term). you buy clay in various levels of aggressiveness. i normally have two types ready to go...i'll start with a mild one and if that doesn't do the trick, then i step it up to the stronger type. depending on the paint hardness, clay type, etc, you will usually introduce a certain level of marring to the paint. i usually plan on polishing after claying anyway, so removing these new scratches is nothing to be worried about.
what is important during claying:
1. use plenty of lubricant (clean soapy water or a quick detail spray) at all times
2. if you drop the clay on the ground: THROW IT OUT (never reuse clay if you drop it...even if you think you can pick out the dirt/rocks...you'll be sorry if you reuse it!!!)
3. check the clay frequently for dirt and kneed it/fold it over frequently to keep a fresh surface on the paint.
claying never takes me that long...to do an entire car is maybe 30 minutes. if it is heavily contaminated it will take longer.
here is an example of what clay can do...this was a VERY contaminated black tahoe. the clay got this dirty after only 1/3 of the tailgate...and remember, all of this crap is pulled off the paint AFTER a full washing.
-
Executioner
- Life Member
- Posts: 10352
- Joined: Wed Nov 22, 2000 11:34 am
- Location: Woodland, CA USA
you can buy clay at most auto stores, maybe Target, CarQuest, etc (or online, of course). a common over-the-counter one is Meguiar's or Blue Magic. it may come in a kit with a bottle of spray to use with it, along with a towel or something...i just buy it separately online and make my own solution to spray on it (cheaper).
regarding water stains...that could be easy or difficult...depending on what's happening. water may leave residue on top that you can clay off, but often it etches the clear coat and the paint must be polished (or even wetsanded in extreme cases) to remove the etching.
you could even try using white vinegar on a towel. wipe the (pre-cleaned) area gently with a microfiber towel damp with the vinegar. if the residue is on the top of the paint, the vinegar should dissolve it. if not, then try clay. the vinegar will strip wax/sealants though...so reapply protection after done.

Detailing Procedure:
I prefer Zaino products for my detailing. They are very durable and only need applied 1 or twice per year. The more you layer their product, the deeper the shine will be. A starter kit containing the products I reference below is available here: http://www.zainostore.com/Merchant2/merchant.mvc?Screen=PROD&Product_Code=ZKIT-1&Category_Code=Zaino&Product_Count=21. The Z-PC Fusion Dual Action Paint Cleaner Swirl Remover is purchased separately.
Wash car thoroughly with a good shampoo made for cars. NEVER use diswashing liquid. I prefer Zaino Z-7 Show Car Wash.
-Spray car to remove any loose dirt and then wash car from top to bottom using a Wool Wash Mitt. I use to use sponges and the prolonged use will scratch the paint. Wool mitts are more forgiving since they have a deep nap. Rinse mitt frequently.
-Rinse off soap using a moderate spray. Don't let soap dry on car.
-Use an electric leaf blower to blow off the excess water. Use 100% cotton Made in the USA towels to dry the remaining water. Towels not made in the USA could contain synthetic fibers that could scratch the surface. Before using the towels, wash without fabric softener and dry without dryer sheets.
Clay the entire car and pay attention to problem areas such as the front bumper, lower fenders, and lower quarter panels. I prefer Zaino Z-18 Claybar.
-Tear the bar in half and knead the bar with a a spray or two of the lubricant which is a capfull of the Z-7 wash in a garden sprayer full of water.
-Begin claying the car one small section at a time by spraying the panel and wiping with the clay back and forth until the surface feels smooth. With practice you will feel the panel get smoother through the clay. Another check is to run a finger across the surface. It will literally be squeaky clean.
-Wipe excess lubricant with a 100% Cotton Towel.
-Remember to knead the clay frequently. If the bar is dropped, throw it out.
-The clay is good for removing surface containinants, bugs, and tar.
Go over the entire cay with detailing spray. I prefer http://www.zainostore.com/Merchant2/mer ... t_Count=11.
If the surface is newer and doesn't have any surface scratches, proceed to polishing and sealing. If the surface has a holigram effect, Zaino Z-PC Fusion Dual Action Paint Cleaner Swirl Remover is an excellent product.
Next, mix up 1 to 2oz of the Zaino Z-5 with 4 to 8 drops (4 drops/oz) of Zaino ZFX Flash Cure Accelerator Additive. You will only need 1oz per coat. The number of coats depends on how much time you want to spend polishing your car. The more layers, the deeper the finish will look. New paint only needs one coat.
-Apply the Z-5 as thin as possible using a cotton applicator pad.
-Let the product set for at least 30 minutes before attempting to remove it. If it's not dry, you only spread it around. Use a 100% Cotton Towel (Made in USA) to remove the Z-5. It is really easy to remove if fully dry.
Go over the car again with the Z-6 spray. This removes anything you missed and makes the next coat easier to apply.
Either apply another coat of Z-5 or continue with sealing with the Z-2 Pro.
Mix up 1 to 2 oz of the Z-2 Pro as you did for the Z-5 Pro. I generally only apply 1 coat for new paint. Again the more you layer this the deeper the shine. Remember to apply the Z-6 in between coats.
-Apply the Z-2 Pro as thin as possible. Excess will take longer to dry and will be more difficult to remove. One oz should be sufficient for 1 coat.
-Z-2 Pro needs to set at least an hour before removing. You can leave this on over-night if you want. It won't hurt anything.
-Remove with 100% Cotton Made in USA towel.
Go over the car again with the Z-6 and you are finished (with the paint).
I also use these products on my wheels. They do an excellent job. I'll update this with pictures later.